
Making pom poms from yarn is a skill that’s useful whether you’re a parent or an avid crafter. What say you? If you’re remembering your childhood craft class and the thin cardboard circles used to manufacture pom poms, I sympathise. Just completing the first round of yarn wrapping would take an eternity.
If you need to make a lot of little pom poms, this is a major hassle. But have no fear. The effort it takes to manufacture one of those wacky cardboard circles is more than offset by the ease and speed with which many poms may be created.
What’s more, there’s no cardboard in this how-to. With the exception of the toilet paper rolls, no cardboard will need to be cut for this undertaking. Yay! Instead, you’ll practise making pom poms with your fingers and some yarn.
Furthermore, the pom poms can be made in a variety of sizes, depending on the yarn you choose to work with. So, without further ado, here is our quick and easy finger puppet tutorial. Brace yourself: your career as a pom-pom maker has just begun!
Materials Required for Making Pom-Poms
Here’s a detailed tutorial on how to make your own pom poms out of yarn. In addition to a comprehensive materials list:
What Materials Are Available for This Art Project?
- Your preferred hue of yarn (Two cones of standard-density yarn should be sufficient)
- Snippy shears
- Your own hands and fingers are the best equipment ever.
Pom-Pom Making Instructions:
- To protect the yarn from unravelling as you wrap, tuck the tail between your ring and pinky fingers.
- Make a knot between your index and middle finger with the yarn. 20 times. (It will get fuller the more you wrap it. Larger pom poms can be made by wrapping yarn over three or four fingers instead. Severing the yarn. Cut out a section of roughly 6 inches with your scissors. You can cut it down afterwards.
- The 6-inch section is pushed in a V form between two fingers. Gently twist your fingers to remove the rings.
- Make a snug knot in the middle of your strand of loops.
- Cut through the middle of the loops on both ends. Cut the yarn so that it is uniform in length.
How to Make Fluffy Pom-Poms in Seconds
You can stop reading now if you’re satisfied with your wool or yarn pom poms in their current state. But what if you want to give them that extra fuzzy quality? While perusing online craft forums late one night, I stumbled upon a YouTube channel with a video that completely blew my mind and led me to this method.
You’re going to adore this method, believe me. Let’s be honest: even if you’re an expert at producing pom-poms the old fashioned way, your finished products will never measure up to the dense pom poms sold in craft stores. To improve your pom poms, try following these steps.
- When the pom pom is finished, the yarn ends can be brushed out using a fine comb (as shown) or a small fork. To maintain a consistent length and clean edges, work with one yarn strand at a time.
- The next step is to use your fingers to puff out the pom-pom’s edges before trimming away any excess yarn.
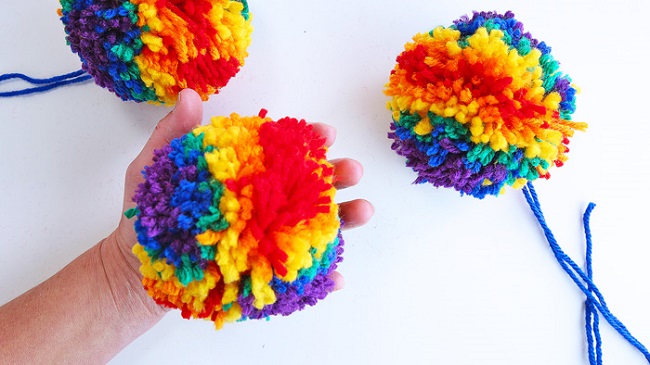
Here we have the ideal pom pom. That settles the matter, period. The entire process of making this lovely fluffy little circle of joy takes no more than five minutes.
Instructions for Applying Homemade Pom Poms
These pom poms can be put to a wide variety of uses. Here are a few suggestions that can be modified to fit your pom poms.
- Put a big pom pom on top of a hat you bought at the store to make it look fancier.
- Create a fun toy for your cat by tying a tiny or medium pom pom to the end of a thread.
- Make big pom-poms and sew them randomly onto a strand of yarn in a contrasting colour. Just repeat the process six or seven times, and then hang the finished product on the wall.
What are you planning to do with all of these DIY pom poms once you’ve finished making them? Here’s what we did with ours, if you’re interested. After making a batch of ten pom poms, we decided to hot glue one to the tip of each glove finger.
We attempted to sew the pom-poms on using yarn, however the yarn easily slid through the knit of the gloves. After donning gloves and a low-temperature glue gun, I affixed each pom pom to the top of my fingernail.
This allowed you to keep your hands warm with a cup of hot chocolate while watching the game, without having to put it down. That is one fantastic method to cheer on the home team. They’re still adorable in black and gold, but even more so in silver and blue.
From start to finish, making a pair of these cute tiny fan hands takes less than 30 minutes. Among the DIY projects I’ve done recently, this is one of my favourites. If so, great! Not into sports? Nothing wrong with that!
Having tiny pom poms on the tips in royal colours would make these adorable. I trust that you have had fun with today’s DIY! Visit our craft page for more ideas (including sewing and crochet projects) if you want to get crafty (and especially if you have extra yarn).


")


