
You may have overheard the bartenders giddying over ice. Or perhaps you’ve seen that some bars disclose the ice kind used in their cocktails. Ice, and especially clear ice, is a crucial component of every premium homemade drink.
We talked to Becky Hammond, Director of Beverage at STIR, a prominent cocktail bar in Raleigh, North Carolina, to get her take on why clear ice is important and how to make clear ice cubes at home.
Every two to three days, a patented machine at STIR generates two 300-pound blocks of ice, which a “ice chef” subsequently carves into seven distinct ice varieties.
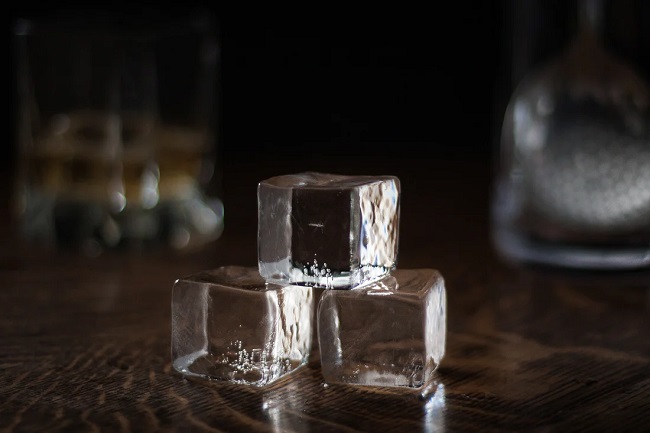
Why Is Clear Ice so Important for Cocktails?
Hammond elaborates on the fact that various forms of ice melt at various speeds. This means that the other ingredients in a cocktail can be appreciated to their maximum by adjusting the rate of dilution and the consistency of the beverage based on the type of ice used. That’s when crystal-clear ice comes in handy. The aesthetic impact is undeniable.
Because of the effort required to make it, the answer is yes. This indicates high quality and price. However, because it is denser and has fewer air bubbles than hazy ice, it melts at a slower rate. STIR’s bartenders take the time to learn about each customer’s preferred cocktail or spirit so they can recommend the best ice cube for diluting it.
Be mindful. Old-fashioneds, which are meant to be sipped leisurely, benefit greatly from being chilled with large, clear rocks rather than ice cubes. Quick-drinkers like palomas benefit from the clarity of smaller, clearer rocks. Clear ice in the shape of spheres is ideal for serving whiskey at the same temperature throughout the glass.
Can You Make Clear Ice at Home?
There are a plethora of methods for making crystal clear ice. The majority of them revolve around beginning with high-quality water. We put every strategy to the test to identify the successful ones, saving you the trouble.
Over the course of 24 hours, we used standard ice cube trays to freeze tap water, hot boiled distilled water, warm boiled distilled water, and room temperature distilled water.
The cleanest ice cubes we saw were made with hot boiled distilled water, but even those weren’t perfectly transparent. It didn’t seem like it would be worth the effort to make ice cubes that weren’t completely transparent.
How to Make Clear Ice
The principle of making transparent ice is as follows. Typically, ice cubes freeze evenly on both sides. This causes the ice to freeze in a way that isn’t uniform, which leads to less flawless ice forms and the accumulation of air and debris in the center of the cube.
Water frozen in a cooler freezes in a specific direction, starting at the top and working its way down. Because of this, the ice is able to crystallize into its characteristically flawless form. Air and particles that melt into the water below the ice cube are carried down there.
Step 1: Freeze Warm Water in a Cooler for 18 to 24 Hours
Locate a compact cooler that can be stored in the fridge. Then add 4 to 5 inches of warm tap water to the cooler. Please don’t use hot water. Don’t close the freezer door just yet, but put the cooler inside.
So long! Put the cooler in the freezer for 18 to 24 hours to freeze the water to a depth of several inches. Keep some water under the ice so it doesn’t grow murky and ruin the experience.
This is how it will appear right now. You’ll see that our ice has a few crystals on the exterior edge; feel free to toss aside the very icy pieces. You can either not utilize it or, like us, not care.
Step 2: Remove the Ice From the Cooler
When you’re ready to turn the block ice into ice cubes, take it out of the cooler. You can accomplish this by inverting the cooler in the sink for 5-10 minutes. It’s possible the ice cube will just slide out. You may also just give it a light shake to get it out of the fridge.
Step 3: Cut the Ice Into Cubes with a Serrated Knife
Now comes the exciting part! To break up the ice into manageable chunks, you’ll use a serrated knife. Instead of chopping, you’ll be scoring the ice in order to break it. Follow these steps: Use an oven mitt or dish cloth to hold the ice.
Lightly score the top of the ice with a serrated knife and slide it back and forth until a strip of the ice pops off to use as a cutting guide. Cut the strip into cubes with the same scoring process.
Step 3: Shape the Clear Ice Chunks with an Ice Pick (Optional)
Use an ice pick to perfect the form of ice you intend to serve immediately. We won’t even pretend to know anything about the art of ice carving. To achieve the desired form, such as an ice sphere or a snug fit in the glass, an ice pick is used.
Conclusion
Making clear ice seems like a waste of time. Well, that’s the question I posed to Alex when he first mentioned his intention to develop this technique. Crisp freeze? No way could it be so awesome, right?
The first cocktail he mixed with it certainly left an impression on me. Artisanal ice cubes are wonderful to look at, and they elevate the visual appeal of any beverage. It will make your visitors feel like a million bucks and is the ultimate party trick. Here is our easy approach.


")


